PC Jargon has moved to its very own site, pcjargon.net!
Bookmark it, etc etc. an RSS feed will be setup soon for it.
Monday, January 24, 2011
Thursday, January 20, 2011
How to setup your HDD for Dual Booting
I know I am a bit late in showing how to setup your HDD for dual boot, so here it is:
If you have ever spent any time researching Linux or Unix at all, you have probably come across this phrase “dual-booting”. Most likely you already know what it means, and some of you even know how to do it. But many of you probably do not know what dual booting is, so I am going to explain what it is, and show you how to do it!
Dual Booting is when you have two different operating systems on your hard drive at the same time. When you boot your PC, you can choose which operating system to start up through a program called a boot loader. Some people dual boot different versions of Windows for their job, mac users can dual boot OS X and Windows. But the most common type of dual boot is when someone installs Linux on their PC to use or play around with. Let’s get to it!
Here is what you will need:
1. Large enough hard drive for dual booting. Anything over 100 GB is good, over 300 GB is optimal. Make sure you have enough free space.
2. Linux OS of your choice. I am going to use Ubuntu.
3. We are going to start with a Windows 7 installation, because it’s easier that way. Windows Vista is also easier, but windows XP doesn’t work great.
I am assuming you have already setup your Linux installation so you can boot it either from a CD, DVD or USB drive. If you haven’t take a look at How To Install Linux On A USB Thumb Drive.
So with our Windows 7 or Vista installation we start preparing our hard drive for another operating system.
Preparation
Go to Disk Manager by Right clicking on Computer and click Manage. Go to the appropriate page, which is located on the left side of the window.
Find your main Hard Drive and right click on the C:/ block, then shrink the partition to what you think is appropriate. I recommend anything above 50GB’s but like I said, it needs to be able to fit the OS you chose, and save SOME settings. For my laptop I have a 500GB hard drive so I split off 100 GB for my Slackware installation.
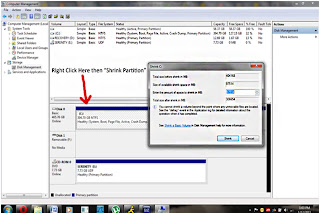
After doing that you should have an amount of HDD space that is Unallocated. Do not do anything with it. Certain types of file systems created by Windows cannot be read by Linux and vice versa.
Now you are done setting up your HDD in Windows, you can start installing Linux.
Wednesday, January 19, 2011
What is the Registry?
The Windows operating system has different levels of components, and parts. One such component is the registry, which is a hierarchal database that stores different configuration settings for ini files, which are program settings in text files. The registry works mainly with low level components. The term “low level” refers to components that communicate closely with the hardware. The registry is an important part of the operating system and contains settings for components and programs such as the kernel, device drivers, services, SAM, user interface and most third party applications. The registry is a little different than any other components you might encounter because it uses keys and values. There is a basic hierarchy of keys and at the end of the hierarchical tree there are the values. These values are settings, and most are either in hexadecimal or binary form. The keys themselves use backslashes to indicate levels in hierarchy.
There are seven predefined root keys, and are called Hives. These hives are:
• HKEY_LOCAL_MACHINE or HKLM
• HKEY_CURRENT_CONFIG or HKCC (only in Windows 9x/ME and NT-based versions of Windows)
• HKEY_CLASSES_ROOT or HKCR
• HKEY_CURRENT_USER or HKCU
• HKEY_USERS or HKU
• HKEY_PERFORMANCE_DATA (only in NT-based versions of Windows, but invisible in the Windows Registry Editor)
• HKEY_DYN_DATA (only in Windows 9x/ME, and visible in the Windows Registry Editor)
Since this is a very important area of the computer, only users with specific permissions can access or edit it. Administrators usually have access, unless otherwise specified.
It is important to know that the registry is an important part of the operating system, and should never be tampered with unless you know what you are doing. There is a windows program that will allow you to edit the registry, called regedit.exe
There are also files that are text-based-human-readable files and they store parts of the registry. The extension for these files is .reg. These files can also be used to add or remove registry keys and values by double clicking on them, once again you should only use them when you know what you are doing or following instructions of a knowledgeable person.
I hope this helped to expand your knowledge of the Windows operating system.
Monday, January 17, 2011
64-bit Operating Systems
So if you have been reading my posts you will have noticed that I have mentioned 32-bit and 64-bit programs and operating systems. So I am going to explain what they are. The 32-bit or 64-bit refers to how the CPU handles RAM (Random Access memory). 32-bit operating systems can use almost up to 4 GB’s of RAM efficiently, anything above that can be handled much better by a 64-bit operating system. In fact 32-bit operating systems can only read around 4 GB’s so if you have a computer with more than 4 GB’s, chances are you have a 64-bit operating system. If not you are just wasting valuable speed and power.
Not too long ago 64-bit operating systems were not well supported, at least by Microsoft. I remember when my computer was running XP 64-bit edition, it was good but slightly less stable than the 32-bit XP edition. However somewhere between XP and 7 computers started selling with 4 GB’s of RAM and over, so 64-bit operating systems started taking off. Now 64-bit Operating Systems are quite common.
The way 64-bit operating systems work is incredibly different from their 32-bit counterpart. Therefore you normally would not be able to run 32-bit versions of any software on a 64-bit OS, fortunately there are ways to run a 32-bit program on 64-bit operating systems. The Windows Operating System has a subsystem called WOW64 (Windows 32-bit On Windows 64-bit) which emulates a windows 32-bit operating system. With a Linux system you will either need to download 32-bit libraries for your programs, or find another way. But just like other operating systems, you don’t need to look to far to find 64-bit programs.
There are tons of programs out there that come in 64-bit versions. But there are a few that you should probably have if you are running a 64-bit OS. Such as a Registry Cleaner which is an important tool for any system, because it keeps the registry running nice and smoothly. You should never attempt to run a 32-bit Registry cleaner for a 64-bit operating system. If it runs it could cause damage to the registry itself, which is a very important part of the operating system. Another is anti-virus software, or internet security suite, whatever you want to call it. Any computer security suite should be a 64-bit version so that it can properly scan your system and detect problems. You will also want to get a 64-bit disk defragmenter if you don’t like using the built in disk defragmenter.
If you still want to know more about 64-bit operating systems, check out this site, its called start64 and they always have the latest on anything 64-bit. They know about both windows and linux 64-bit stuff, and they report on the latest 64-bit programs. Once again I have no affiliation to them. Check them out.
Sunday, January 16, 2011
Disk Defragmentation
Since I started fixing my own computers there has always been one subject that I never fail to see on a computer tech website, and that subject is disk defragmentation. So I figure I should add my own disk defragmentation information.
Solid State Drives
Let’s start with the newest type of HDD’s first. Solid State Hard Drives are the newest, most expensive, and arguably the best hard drives out there today. I say arguably because you really can’t compare a $184 dollar 80 GB SSD to an $80 dollar 2 Terrabyte Hard Disk Drive (1 Terrabyte = 1024 Gigabytes). Anyways Solid State Drives have their own way of defragmentation and you should not attempt to defragment them yourselves. This is due to the fact that Solid State Drives operate in a much different fashion and defragmenting them yourself will put unnecessary wear and tear on them and cause them to wear out faster.
Hard Disk Drives
Now, this is probably what you have in your computer right now, a hard disk drive, more commonly called a hard drive. The hard drive is made up of these disks called platters, which reads and writes data. Data is made up of what are known as bits. Each bit represents and on or off state, which is read as a 1 or 0 respectively. On a hard drive an entire program or file is not kept in one spot. Instead each file or program is distributed on the disk in pieces. As these pieces are moved around small amounts of bits are left behind on the disk. This is called fragmentation. As fragmentation builds up the pieces of files have less and less space to use, because of the fragments of other programs lying around. So to keep your hard drive clutter free you need to defragment, which moves the fragments back to where they are supposed to be.
Now XP and Windows 7 have nice ways to defrag your hard drives. Both show you how much your disk is fragmented, and with what. Then it shows you as it reunites your fragmented files with each other. However Windows Vista does not. It has one button that says “defragment”. I think it was one of Microsoft’s attempts to “simplify” things for average users. And it might have, unfortunately there is also a vast amount of experienced users, and for me at least it annoyed me to no end. So I was forced to use a third party program. Now third party programs are not bad, in fact they do a much better job than the defragmenter that Windows usually comes with. You should defrag your hard drives every month or so, and it will keep your computer running fast and smooth.
how to get rid of Anti-Virus Soft
There are many different types of computer viruses. Some are just annoying, some are malicious, and some take control of your computer to perform undesired operations. These undesired operations range from directing your browser to random websites, or locking down your computer. The viruses that lock down your computer usually want you to pay for something. One such virus is called Anti-Virus soft, and its whats known as a rogue anti-virus program. It locks down your computer claiming you’re computer is infected and it tells you to fix it you need to purchase anti-virus soft. Anti-Virus soft also tends to keep your anti-virus software from working, so you need to find another way to remove it.
This guide will show you how to remove the Anti-Virus Soft program without having to take it to a professional and spend a bunch of cash.
1)Boot your computer into safe mode, by restarting your computer and holding down F8 before the windows logo appears. A list will appear and the list should say
Safe Mode
Safe Mode With Networking
Safe Mode With Command Prompt
2) Click on the Safe Mode With Networking wait for it to boot up. There will be long lines of text, and after a while it will boot into windows with a slightly larger tool bar and icons than you might be used to. Don't worry. This is only temporary, when you boot back normally all your settings will be back to normal.
The reason the safemode desktop looks like this is because safe mode loads only basic drivers necessary to keep your computer running so you can tinker around and remove problems that can be caused by programs that are not part of the bare bones operating system.
Once everything loads Open Internet Explorer. Click on the Tools menu and then select Internet Options.
In the the Internet Options window click on the Connections tab. Then click on the LAN settings button.
Now you will see Local Area Network (LAN) settings window. Uncheck the checkbox labeled Use a proxy server for your LAN under the Proxy Server section and press OK.
This removes the proxy settings AntiVirus Soft sets up, make sure Firefox and any other browser you use has the correct proxy settings.
3)Now the killing blow:
Kill processes:
[RANDOM CHARACTERS]sysguard.exe, for example ghrtsysguard.exe [RANDOM CHARACTERS]sftav.exe
INFO:
how to kill malicious processes
WARNING BE CAREFUL IN THE REGISTRY, DO NOT DELETE OR ADD ANY INFORMATION OTHER THAN WHAT IS BELOW! IF YOU ARE NOT SURE WHAT YOU ARE EXPECTED TO DO ASK ON A TECH FORUM BEFORE DELETING.
Delete registry values:
HKEY_CURRENT_USER\Software\Microsoft\Windows\CurrentVersion\Run ""
HKEY_LOCAL_MACHINE\SOFTWARE\Microsoft\Windows\CurrentVersion\Run ""
HKEY_CURRENT_USER\Software\Microsoft\Windows\CurrentVersion\Policies\Attachments "SaveZoneInformation" = "1"
HKEY_CURRENT_USER\Software\Microsoft\Windows\CurrentVersion\Internet Settings "ProxyServer" = "http=127.0.0.1:5555"
HKEY_CURRENT_USER\Software\Microsoft\Windows\CurrentVersion\Policies\Associations "LowRiskFileTypes" = ".exe"
HKEY_CURRENT_USER\Software\Microsoft\Internet Explorer\Download "RunInvalidSignatures" = "1"
HKEY_CURRENT_USER\Software\Microsoft\Windows\CurrentVersion\Internet Settings "ProxyOverride" = ""
HKEY_CURRENT_USER\Software\AvScan
INFO:
how to remove registry entries
Delete files:
FOR Windows XP: %UserProfile%\\Local Settings\\Application Data\\\\[RANDOM CHARACTERS]sysguard.exe
FOR Windows Vista and Windows 7: %UserProfile%\\AppData\\Local\\\\[RANDOM CHARACTERS]sysguard.exe %UserProfile%\\AppData\\Local\\\\[RANDOM CHARACTERS]sftav.exe
INFO:
how to remove harmful files
Delete directories:
%UserProfile%\Local Settings\Application Data\[RANDOM CHARACTERS]\ (Win XP)
%UserProfile%\AppData\Local\\ (Win Vista & 7)
Now reboot! You should have successfully removed Anti-Virus Soft. Please keep in mind that anti-virus soft might not have been removed this way, and if the problems persist you will need to find another way to remove anti-virus soft.
Wednesday, January 12, 2011
How to Install Ubuntu On Your Computer
Installing Linux on your computer is easier than it sounds. Many Linux programs are actually quite user friendly, and with practice you can be zooming around a Linux OS almost as quickly as you can with Windows. I say almost as quickly because Linux is very different and you have probably been using Windows for quite a while now.
So let’s get to it then.
What you will need:
1. A Linux OS and a way to install it, such as with a USB thumb drive, or CD or DVD.
2. A computer with some Extra Hard Drive space.
For this tutorial and most others I will be using the current version of Ubuntu which is v10.10. I am using the 64-bit edition of Ubuntu, but if your computer can’t handle 64-bit (if you are not sure it probably cannot, but check anyway) then use 32-bit, there is really no noticeable difference to any computer novice. It’s mainly backend stuff.
Installation:
The Ubuntu installation CD (anything having to do with the ubuntu .iso you downloaded will be referred to as the installation CD for the time being) also acts as a live CD, so when you launch it you get a full desktop with some of the features of Ubuntu.
We are going to install ubuntu, so unless you want to play around with the features first, select the install button.
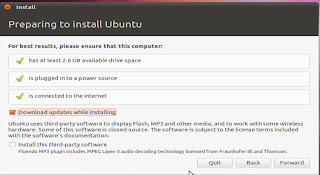
The Installation page will give you a checklist and a couple options. Make sure the computer you are on meets the requirements. If you have an internet connection on that computer you probably want the installation to download and install updates. Check that box if you do. This makes everything easier in the long run.
The next page asks if you want to erase your entire Hard Disk and use the entire thing or specify partitions manually. This is your choice, if you are dedicating your entire computer to Ubuntu, you can chose to erase the entire disk, but if you are dual booting, or if you have data on other partitions, chose specify partitions manually.
Lets take a look at specifying partitions manually. This is a partition manager program, which allows you to create, delete or change your partitions.
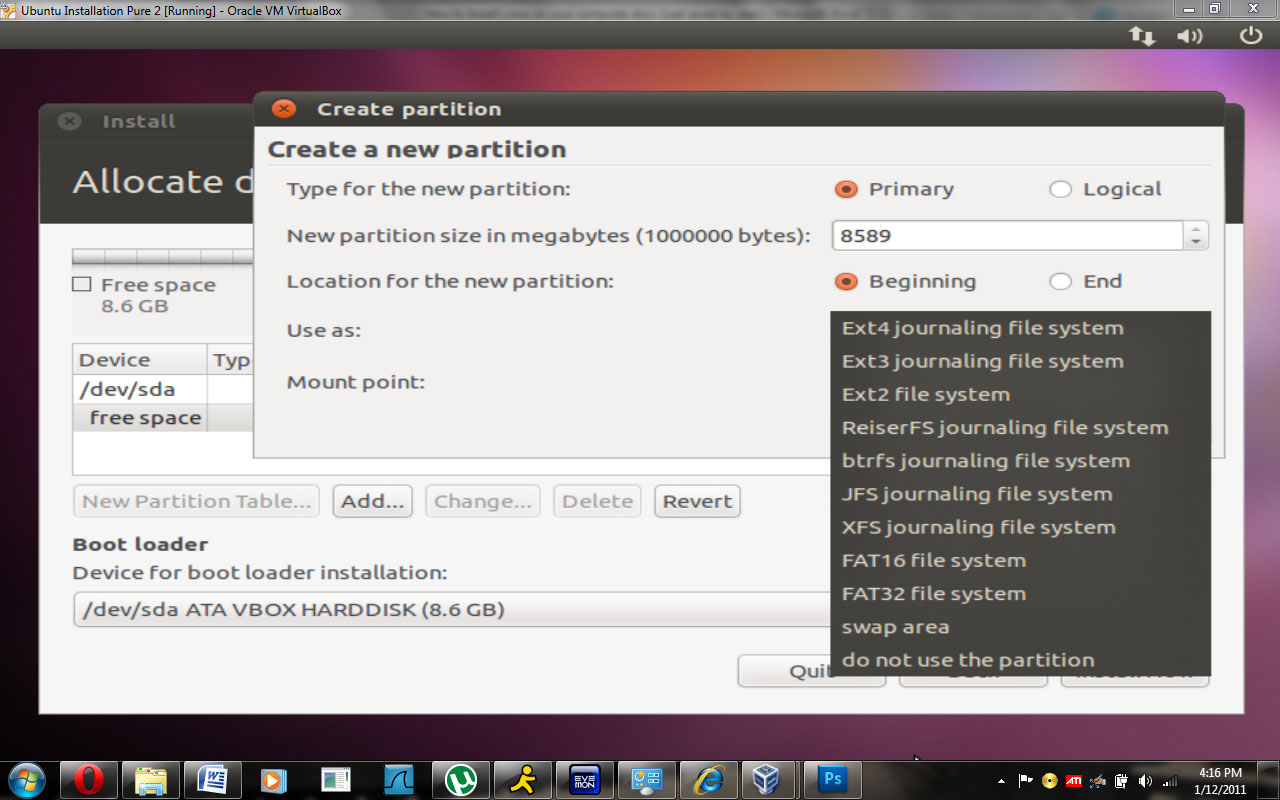
To create a new partition select the partition you want and go to “new partition table”. This will create a new table for you to use, and it might delete the old one. You want to select the new partition as primary, and unless you have a preference chose the partition location as the beginning. If you have free space, go to “add” and specify the partition size.
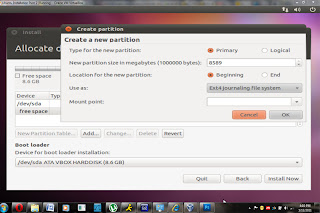
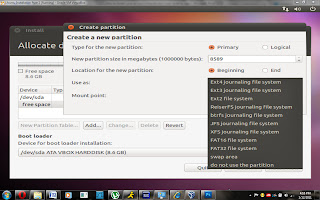
Below the partition size is a drop down menu that says “use as”. This is asking what file system you want to use on the partition. My favorite file system is the ext4 system, which is the newest but if you have another preference you can choose whichever one you want many people prefer ext3 because it’s supposed to be more stable than ext4. Note that “swap” is not a file system but rather a space for temporary storage.
Then create a mount point. The mount point is used as the physical location for your file system. Just type “/” for mount point, nothing else.
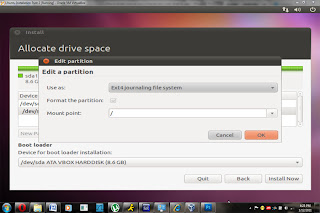
After creating your main partition you will want to create a small swap partition. It can be tiny but you need it.
After you are done with that, select the main partition that you want to install Ubuntu on and click install now.
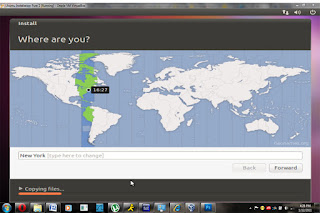
Then go through the customary stuff, closest city, that sort of thing. I know they left some cities out, so select the closest city they have to your location.
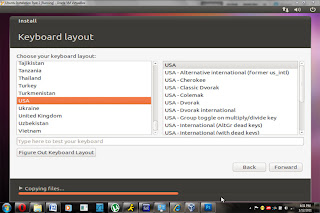
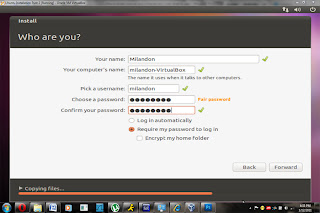
While it’s installing you will be asked for keyboard layout, password and usernames that sort of thing.
Then you will be asked to restart and CONGRADULATIONS you have your very own Ubuntu operating system on your computer!
A guide on Duel Booting will be out shortly.
So let’s get to it then.
What you will need:
1. A Linux OS and a way to install it, such as with a USB thumb drive, or CD or DVD.
2. A computer with some Extra Hard Drive space.
For this tutorial and most others I will be using the current version of Ubuntu which is v10.10. I am using the 64-bit edition of Ubuntu, but if your computer can’t handle 64-bit (if you are not sure it probably cannot, but check anyway) then use 32-bit, there is really no noticeable difference to any computer novice. It’s mainly backend stuff.
Installation:
The Ubuntu installation CD (anything having to do with the ubuntu .iso you downloaded will be referred to as the installation CD for the time being) also acts as a live CD, so when you launch it you get a full desktop with some of the features of Ubuntu.
We are going to install ubuntu, so unless you want to play around with the features first, select the install button.
The Installation page will give you a checklist and a couple options. Make sure the computer you are on meets the requirements. If you have an internet connection on that computer you probably want the installation to download and install updates. Check that box if you do. This makes everything easier in the long run.

The next page asks if you want to erase your entire Hard Disk and use the entire thing or specify partitions manually. This is your choice, if you are dedicating your entire computer to Ubuntu, you can chose to erase the entire disk, but if you are dual booting, or if you have data on other partitions, chose specify partitions manually.
Lets take a look at specifying partitions manually. This is a partition manager program, which allows you to create, delete or change your partitions.
To create a new partition select the partition you want and go to “new partition table”. This will create a new table for you to use, and it might delete the old one. You want to select the new partition as primary, and unless you have a preference chose the partition location as the beginning. If you have free space, go to “add” and specify the partition size.

Below the partition size is a drop down menu that says “use as”. This is asking what file system you want to use on the partition. My favorite file system is the ext4 system, which is the newest but if you have another preference you can choose whichever one you want many people prefer ext3 because it’s supposed to be more stable than ext4. Note that “swap” is not a file system but rather a space for temporary storage.
Then create a mount point. The mount point is used as the physical location for your file system. Just type “/” for mount point, nothing else.

After creating your main partition you will want to create a small swap partition. It can be tiny but you need it.
After you are done with that, select the main partition that you want to install Ubuntu on and click install now.
Then go through the customary stuff, closest city, that sort of thing. I know they left some cities out, so select the closest city they have to your location.


While it’s installing you will be asked for keyboard layout, password and usernames that sort of thing.
Then you will be asked to restart and CONGRADULATIONS you have your very own Ubuntu operating system on your computer!
A guide on Duel Booting will be out shortly.
Subscribe to:
Posts (Atom)